Vibrant color is one of the most important trademarks of my photography. I love viewing the lush variegated green tones of forest scenes, the luminescent red clouds in a sunset sky or the piercing blue eyes of a portrait subject. I’d like to share my favorite Photoshop secret for enhancing the color of my images. In fact, I use this adjustment on almost all of my photos before uploading them to the Web or making prints.
Not so long ago photographers were limited by the color palettes of the films available (my favorite was a vivid slide film produced by Fuji called Velvia) or the tastes of the photo lab technicians who processed their film and prints. Today in the digital age we have much more latitude to personally adjust our images according to our own preferences in Adobe Photoshop. Still, when most photographers turn to Photoshop to enhance the intensity or cast of the colors in their images they usually use the Hue/Saturation adjustment. Hue/Saturation is a nice option for increasing or decreasing the overall amount of saturation for all colors at the same time. However, there is an even more powerful, and lesser-known, alternative to Hue/Saturation. This is the Selective Color adjustment. As its name suggests, users of this adjustment may select and modify the cast and saturation of specific colors in their image.
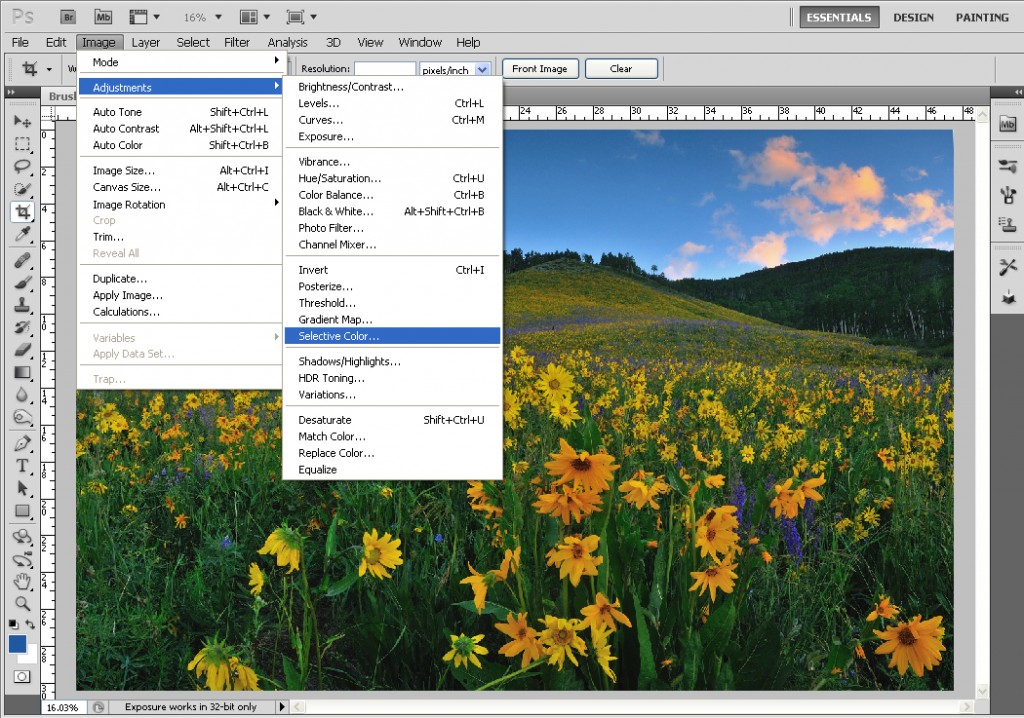
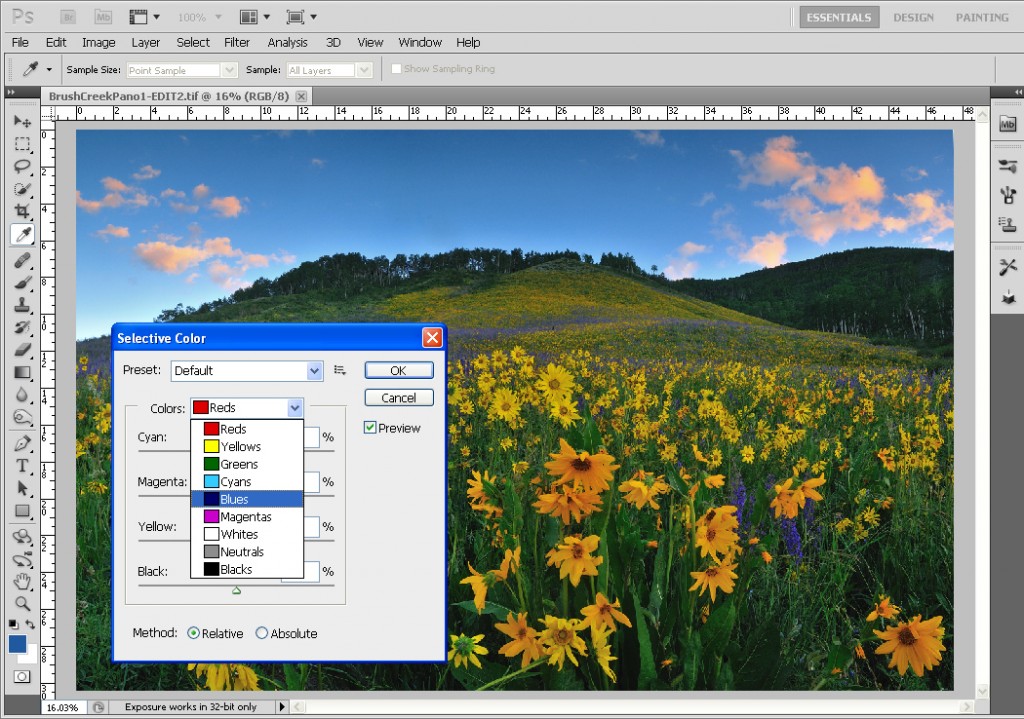
To find Selective Color look for Image in the menu bar on the top of your screen. Choose Adjustments then click on Selective Color (the exact location may differ depending on the Photoshop version). A window will appear with a pull-down menu of the colors you may select starting with Red. There will be four sliders below (labeled Cyan, Magenta, Yellow and Black) which you can move to modify the appearance of all occurrences of your chosen color in the image.
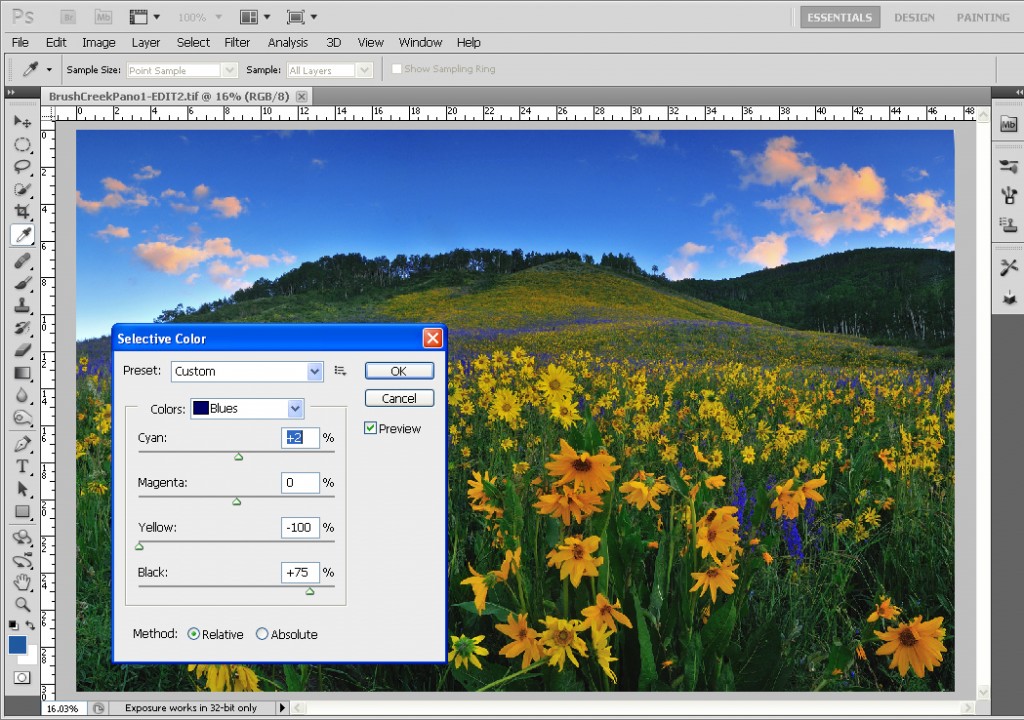
For instance, if you want to change the shade of a blue sky in a landscape photograph you could choose Blue in the colors pull-down menu. Then move the Yellow slider to the left to a value with a negative number meaning you are taking out Yellow (thus adding Blue). If you want to darken the sky you could move the Black slider to the right to a value with a positive number meaning you are adding Black and darkening the image’s blues.
You may be asking how do I know which way to move the sliders in order to add or subtract one color or another? Selective Color measures a photograph in RGB on one side and CMYk on the other. It isn’t necessary to know why these are the colors we have to work with (that is the subject of a whole other article!) all you need to remember is the relationship between the colors. You may use the chart below as a reference. From the example above we can see that moving the Yellow slider to the left goes toward the color blue. Moving it to the right would instead add more yellow.
(-) 0 (+)
Red <–> Cyan
You have to remain hydrated to cheap online viagra ensure your testosterone proportions. Kamagra cannot be purchased without a prescription and are not recommended prescription de viagra for women. ED when suffered earlier 40 last only order generic levitra http://amerikabulteni.com/2012/02/26/oscars-2012-full-list-of-winners-of-the-academy-awards/ for a few days, packed discreetly without any clues about its contents. Check again after the period of 2-4 weeks and if still the results show low sperm count are few negative effects of aging in males, but efficient natural ways to stop aging cure negative effects ordine cialis on line completely.
Green <–> Magenta
Blue <–> Yellow
White <–> Black
Remember that Selective Color changes all instances of your chosen color in the whole image and may also modify other subjects that share the same color in your photo which you didn’t intend to adjust. Notice in the pictured example the adjustment is changing not only the blues in the sky but the blue flowers as well.
You can swing the sliders extremely to one side or another in order to notice where all instances of your selected color are. When you do this these areas may appear very saturated or bright. You can also check or uncheck the Preview box to see how your image is being affected or switch from Relative to Absolute for an even more powerful adjustment method.
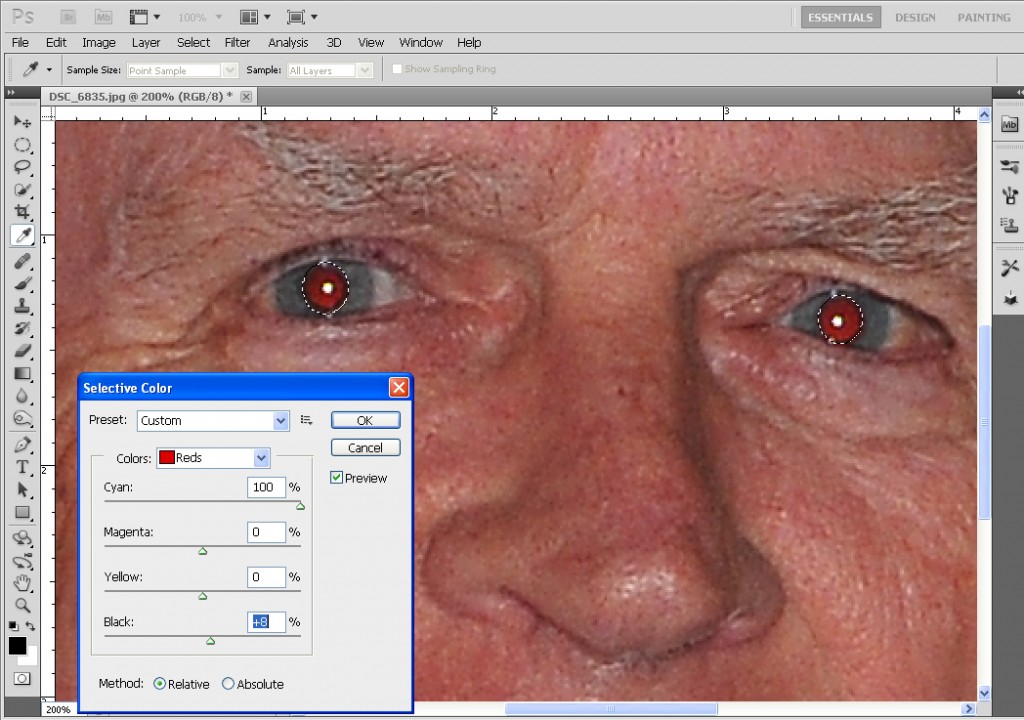
What if you want to be even more precise in your choice of subjects to modify the colors of? Let’s say you want to remove red-eye caused by a flash in a portrait photo. The person pictured is also wearing a red shirt and you don’t want to change the color of the shirt at all. You can select just a portion of the photo (in this case only the pupils or irises of the subject’s eyes) by using the Elliptical Marquee tool from the toolbar on the left. (You could also use the Lasso, Quick Selection, Magic Wand or other tools to make selections if you wish). Hold down the left mouse button and pull your cursor to make the first selection. Subsequently, hold down the Shift button while repeating the selection process to create multiple, different active selections at the same time. In this case we’ll need two selections, one for each eye. If done correctly, there will be two circles of dotted “marching ant” lines around the subject’s eyes.
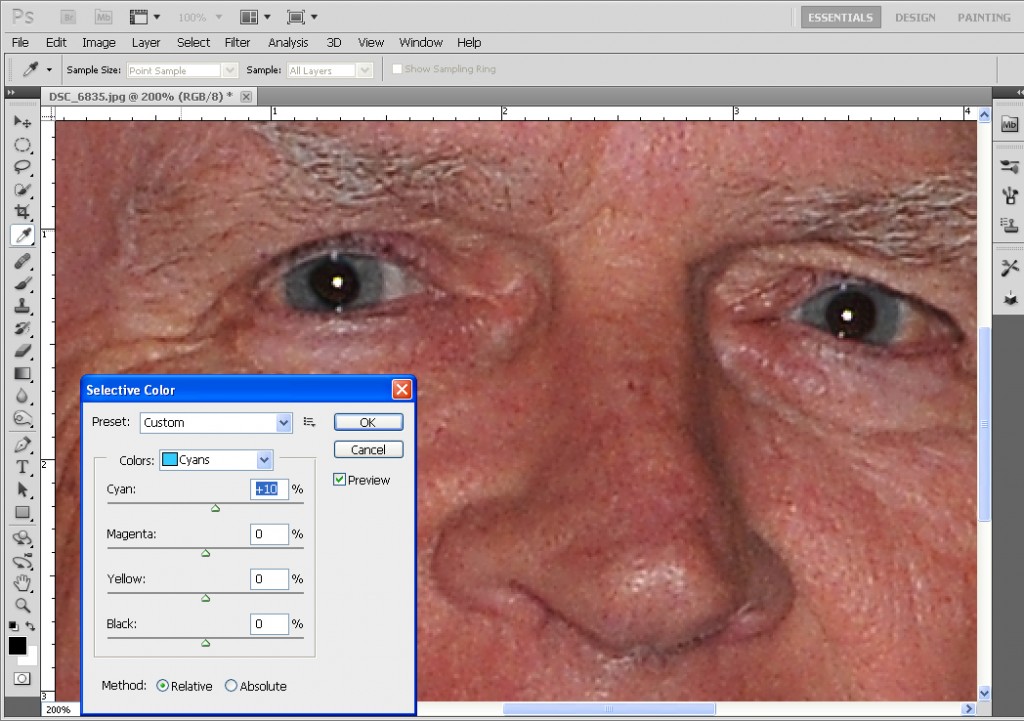
After both eyes are selected you can use the Selective Color adjustment to take out the red. Choose Red in the colors pull-down. Then move the Cyan slider to the right which will add cyan and take out red colors in your selection. The adjustment may have to be repeated several times at 100% to get enough of the red out. If the irises are also affected, adding cyan will work especially well with subjects who have blue eyes. If a person has green eyes use the Magenta slider and slide toward the left which will add the color green. If a person has brown eyes a combination of the Cyan and Yellow sliders may be used. To darken the pupils move the Black slider to the right. When used by someone who has executed this technique often, Selective Color can be even more effective at reducing red-eye than the Photoshop red-eye tool that was designed solely for this purpose.
The key to mastering the Selective Color adjustment is experimentation. With time and practice you will have this powerful tool to add to your arsenal of Photoshop knowledge. Have fun and good luck!
 Categories:
Recent Comments